Poorly Scalextric Sport Digital Lap Counter (C8215)…

Scalextric C8215 lap counter repaired in the workshop…

First off, I must confess, that this is part of my own Scalextric collection, not part of someone else’s.  I’ve always enjoyed slot car racing and a lap counter is an essential addition to anyone who wants to prove that they’re the fastest around the track!  Trust me, it can be very addictive, especially when racing against one’s better half.

IMG_4854
FixItWorkshop, Dec’17, Scalextric Lap Counter C8215

Anyway, I wanted to share this little repair in the hope that others might benefit.

My once reliable lap counter started to miss laps on lane two at very crucial stages of a race.  It started by only happening occasionally before completely missing several laps in a row, forcing a stewards’ enquiry to settle the race finish times.  Lane one was fine.

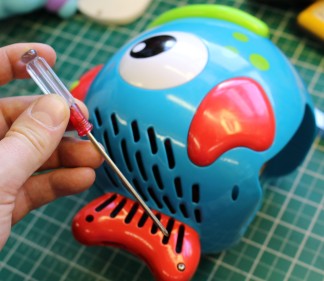
Time to get out the screw driver and delve in to the workings of the timer.  Once removed from the main track layout, the back of the unit has a cover which is held in place with six small self-tapping screws.  These come undone easily and removing the back reveals two sets of electrical switch contacts, operated by a lever on each track, just under the slot car rails.  The idea here is that the slot on the slot car operates the lever as the car passes the lap counter track piece, operating the switches contacts, completing a circuit, thus counting the laps.

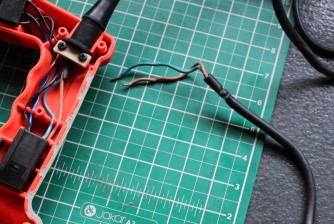
Comparing the switch contact clearances, lane one’s was considerably closer than lane two’s.  This means that the ‘dwell’ time on lane two’s switch would be less that the switch on lane one, which was working ok, meaning a possible cause of the problem.  To anyone who’s adjusted contact breaker points on an old car, you’ll know what I mean here.

I had no idea what the correct clearance should be, so took an educated guess and closed the gap to about 0.5mm, done by eyesight alone.  I made sure that both sets of switches were the same (see photos).  While I had the counter in pieces, I cleaned the contact surfaces with a little electrical contact cleaner, just for good measure.

After re-assembly and re-fitting to the track, a few test laps with my fastest race Mini, proved that the counter was working as it should once again.

Cost of a replacement counter (second hand) circa £12.  Cost of the repair; 10 minutes tinker-time.

Hubble bubble toy’s in trouble.

This bubble machine needed more huff and puff.

About a year ago, we bought an Early Learning Centre Freddy the Fish Bubble Machine for our daughter and it’s been a great addition to summer garden fun, as it unleashes thousands of bubbles per minute.  It’s been truly bubble-tastic.

However, it’s decided to become a little temperamental of late when switched on.  With good batteries and a full tank of bubble fuel, the machine would sometimes cough and sputter and generally be a disappointment in the bubble-making department.

The toy is shaped like a fish, like the name suggests and has a small reservoir for the bubble mix and a carousel of bubble wands operated by a motor which is ‘blown’ by a small fan inside, to inflate the bubbles to the optimal size.

The fault:  The fan would sometimes, by itself, vary in speed, reducing the speed of the air though the bubble wand carousel, which would limit the quantity and quality of bubbles produced.  Most disappointing.

The toy is held together by small Pozi-drive screws and the whole things comes apart in two halves.  It gets a bit tricky inside as there are a few small components held in place using the internal plastic parts.  After testing the batteries, I thought I’d start by testing the action of the on/off switch which seemed to click on/ off OK, but I wondered what the quality of the electrical mechanism was like.  A quick test with the multi-meter revealed slightly variable resistances, indicating either damp or dirt had entered the switch, highly likely considering what the toy does.

IMG_4091.JPG
FixItWorkshop, Sept’17, Early Learning Centre Freddy Fish Bubble Machine

The switch is reasonably well protected from the elements, but I suspect it had become immersed in water, not really what the switch or toy is meant to handle.  It’s not Ingress Protected Rated (IP).

The switch isn’t really designed to be repaired, but after a few minutes bending the small tabs holding it together, I revealed the switch contacts.  A quick clean with switch cleaner and blue towel and the switch was working as it should once more.  Once reassembled, the toy performed well once again and was soon filling the garden with bubbly magic.

Faulty Sun Solar Systems 1500W Pure Sine Wave Inverter (20/07/17)

I couldn’t save the Sun Solar Systems Inverter…

On the back of my Sterling Power Products inverter repair (https://fixitworkshopblog.wordpress.com/2017/04/07/sterling-power-products-pure-sine-wave-inverter-repaired/) a customer enquired to see if I could repair his faulty inverter.

The customer’s inverter had been connected up properly but had been severely overloaded and  it would appear that the protection modules within the inverter had not operated correctly.  Therefore a burning smell had been reported, just before final failure.

This was going to be a difficult repair as I had no schematic diagram for the main PCB and I was effectively going to be testing components in isolation using rudimentary methods.

A quick look around the inside of the unit revealed no obvious damage, but upon testing the IBGT transistors on the units’ high voltage output and several Zenner diodes in line with them, revealed serious damage to that part of the circuit.

These components are not cheap and collectively, the cost in parts alone would have been over £50, without my time factored in and without the guarantee that the unit would work again.  On that basis, sadly, I had to inform the customer that the unit was beyond my help and probably beyond economical repair.  It will therefore be disposed of responsibly at our local amenity tip.


Intermittent Einhell E-BH 950 SDS drill

Poorly drill repaired at FixItWorkshop

The owner of this drill complained that it work perfectly one minute and then stopped the next.  It was making DIY a very slow process.

IMG_3505
FixItWorkshop, April’17, Worthing, Einhell E-BH 950 SDS drill repaired

As this was a cut-out problem rather than a slowing down issue, power problems were a likely suspect.

On test, the cable flex near the base of the handle seemed to be the issue as giving it a good wiggle seemed to reproduce the fault.

Opening up the drill (several self-tapping screws) revealed a fairly straightforward layout with cord, mechanical connector, smoothing circuit (mains splash) and switch.  Having suspected the culprit to be cable flex near the handle, I cut the cable down and re-made the connection, removing the suspect part of the cable.

IMG_3503
FixItWorkshop, April’17, connector shown
IMG_3502
FixItWorkshop, April’17, broken cable removed

Despite cutting the cable flex down by about 8″, the owner was pleased with this fix since no spare parts were required and no real issues will be noticed since it will be mainly used with an extension lead.

Erratic GHD hair straighteners

Straight GHDs

GHD hair straighteners are a premium product which retail for a minimum of £100 in the UK.  However, over time they suffer from common annoying faults which cause owners to condemn the set they have.

This set of straighteners presented ‘as working’ when first switched on.  After warming up, hair straightening temperature was reached within the normal time.  However, after 5 minutes of use, the temperature reduced and failed to re-heat in a reasonable time.  Leaving the straighteners to cool completely would effectively reset the problem, only for  the cycle to repeat again.

GHD faults are well documented on YouTube and the fault turned out to be a faulty thermocouple or thermofuse, which should regulate the temperature and cut power in the event of a fault.  They do however wear out and this set of straighteners was no exception.

img_3218
FixItWorkshop, Feb’17, Worthing, GHD Hair Straighteners …repaired!

After dismantling, the thermal fuse was replaced for £2.70.  The whole job took half an hour and saved the owner nearly £100 on a replacement.

Dyson DC33 repaired in the workshop

A Dyson DC33 gets treated to a new motor

Conked out Dyson DC33

This Dyson presented with a pretty terminal case of ‘no go’.  The owner had run this relatively new machine in to the ground with little maintenance so it was little wonder what happened next.

Whilst in use, the machine spectacularly went bang and tripped the main fuse board of the house.  The noise and following smell was quite something I was told.

The owner had nearly rushed out and bought a new machine and was budgeting between £300 and £400 for a replacement.

IMG_3207.JPG
FixItWorkshop, Worthing, Feb’17. Dyson DC33 motor replaced

I was glad I could help since I was fairly certain I knew what the problem was without seeing it.  After giving the cable, switches and casing a visual inspection, it was time to delve deeper.  The filters were in poor condition and the general smell of it indicated that overheating had been an issue, probably leading to premature wear on the motor.

With the motor out, the true extent of the damage became apparent.  Both motor bushes had worn away to nothing and part of the brush holder had broken up inside the motor, probably while it was running, causing the noise.

I suspect that the owner had ignored the warning signs of burning smells and occasional cutting out (as the thermal overload circuitry performed its fail-safe role).

Being only a few years old, the owner had a couple of options; either replacing the faulty part with a genuine Dyson replacement (a very reasonable £40) or pattern motor kit with filter pack for under £25.  The owner chose the latter on the basis of the machine’s age and the fact that both filters in the machine were also ruined.

The job took an hour, including testing before the machine was back performing its cleaning duties once more.

A note to all vacuum cleaner owners (that don’t take bags):  Keep your filters cleaned every couple of months or so.  Your machine will last much longer if you do.

Lazy Dyson DC04 Vacuum Cleaner

Dyson DC04 brush problems

Sadly, I’ve seen loads of these older Dyson machines at the tip in recent years.  I suspect, with a bit of fettling and cleaning, they could be brought back to rude health.

This one was one a high-mileage example and needed some tinker-time to get it back to a serviceable condition.

It was working of sorts, but failing to ‘pick-up’ as well as it used to.  It turned out that the roller had two problems.  The main bearings were worn, making a squealing noise and the brushes had worn low.  This part used to be available from Dyson, but due to the age of the machine, they quite reasonably, stopped selling them.  However, the net is awash with reasonable pattern parts for Dyson machines and while I tend to stick to original equipment wherever possible, a replacement roller from ebay for under £10 was a reasonable choice for this 15 year old vacuum cleaner.  A replacement Dyson vacuum cleaner would be at least £250 for a basic model at time of writing.


img_3203
FixItWorkshop, Worthing, Feb’17.  Dyson DC04 repaired.


Just a note on Dyson machines:  Having studied the company at school and following their progress for a number of years, they seem to be a firm believer in providing accessible and affordable parts to keep their products alive.  They’re an excellent example of a company that truly believes in product sustainability.

http://www.dyson.co.uk/Spares.aspx


Chilly Hotpoint Tumble Dryer (VTD00)

A cheap fix for an old tumble dryer.

A tumble dryer that didn’t dry

img_3201
FixItWorkshop, Worthing,  Feb’17.  Hotpoint (VTD00) tumble dryer (Ariston, Creda, Indesit similar.  Now drying once more…

This machine is our very own, which decided to stop drying clothes.  Everything seemed to work; the drum was going around, the timer was working and nothing sounded out of sorts, but it started taking longer and longer to dry clothes.  In short, it wasn’t well.

This particular model is well documented online as it’s the same one with a world-wide model recall.  Fortunately, Hotpoint/ Indesit/ Creda/ Ariston have an excellent recall process and information service.  In fact if you’re concerned about yours, please visit http://www.hotpointservice.co.uk/safety-notices/ to see if your machine is listed.  This machine had been modified and was cleared safe for use.

Anyway, it was time to dig out the tools.  There’s not much to a tumble dryer really, the most expensive and important part being the motor, which in this case was fine.  Having tested the heating elements for suitable resistance, it was time to check the wiring, which also tested fine.

Since the machine would heat up and then cool, it suggested a temperature control system fault.  This machine has three temperature sensors; one in the exhaust and two on the back of the heater, the latter two to act as heat control and safety cut out.

If you’re still reading,  it turned out that the exhaust thermostat sensor was at fault.  Once it has allowed a brief heat cycle, it would shut down for ages.  It had excess temperature switch ‘hysteresis’.  The spare part was about £12, so versus the cost of a replacement machine at about £170, it was well worth spending time on the machine.

Kenwood Chef Repair

Kenwood repair in Worthing, West Sussex

Smelly Kenwood Chef A901

img_2959-resized-smaller
FixItWorkshop, Worthing, Jan’17.  Repaired Kenwood Chef A901

This Kenwood Chef developed a nasty little problem. The failure smelled expensive and the Chef even puffed out some smoke when it began to fail, it would operate, but noisily and badly, so it to the workshop it had to go.

It was in decent overall condition and has loads of accessories, so definitely worth saving since a new one is over £300 new.

Since the speed control circuitry is a common failure on models of this age, it seemed sensible to start there.  On this unit, access wasn’t a problem and the issue was quickly diagnosed.  Both capacitors had failed (spectacularly)  and one of the resistors had become weak by about 20 Ohms or so.  Repair kits are readily available online for those who are willing to save these excellent machines, so after removing the faulty components, new items were fitted.

Another little annoying problem with the Chef, was the main drive belt.  It was intermittently rubbing the main plastic body of the unit, making a horrible sound and melting some of the casing (only cosmetic).  The motor mounting spacer had compressed on one side causing the belt to not run correctly.  This was fixed with a small washer to correct the belt’s alignment.

With a little bit of grease, WD40, Brasso, contact cleaner, repair kit and washer, the whole job took a couple of hours (including fettling time) and cost me under £8.  Definitely worth the effort considering the price of a replacement Chef.

Here’s a picture of the new components fitted in situ…

img_2958-circles
FixItWorkshop, Worthing, Jan’17.  New capacitors, resistors and triac fitted, fixed!